This rhubarb custard pie recipe is a springtime classic that balances the sharp tang of fresh rhubarb with the creamy sweetness of vanilla custard. It’s easy to make, uses simple ingredients, and delivers a dessert that’s both nostalgic and exciting. Perfect for picnics, family dinners, or impressing your neighbors, this pie is a crowd-pleaser. Bonus: We’ve added a strawberry twist for extra color and flavor!
A Story to Make You Smile: The Rhubarb Rebel
When I was 7, I snuck into Grandma’s garden and bit into a raw rhubarb stalk, thinking it was candy. My face puckered like a raisin! But Grandma laughed, handed me a slice of her custard rhubarb pie recipe, and said, “Sweet fixes sour.” That pie changed everything. Now, I’m sharing her secret with a twist.
Fun Fact: Rhubarb is technically a vegetable, but a 1947 U.S. court case ruled it a “fruit” for tax purposes. Talk about a legal dessert!
A creamy, tangy pie with fresh rhubarb and vanilla custard. Optional strawberries add sweetness.
Course Dessert
Cuisine American
Keyword recipe for rhubarb custard pie, Rhubarb Custard Pie Recipe, rhubarb pie recipe custard
Prep Time 20 minutesminutes
Cook Time 50 minutesminutes
Resting Time 1 hourhour
Total Time 2 hourshours10 minutesminutes
Servings 8
Calories 400kcal
Cost 11
Equipment
1 pie dish (9-inch)
1 mixing bowl
1 Whisk
Measuring cups/spoons
Oven
Ingredients
1pie cruststore-bought or homemade
3cupsfresh rhubarbchopped (or frozen, thawed)
3large eggs
1½cupswhite sugar
¼cupmelted butter
¼cupflour
1tspvanilla extract
½tspsalt
Optional: 1 cup sliced strawberriesfor strawberry rhubarb custard pie recipe
Instructions
Preheat oven to 375°F (190°C).
Press pie crust into dish; poke holes with a fork. Prebake 10 minutes.
Layer rhubarb (and strawberries, if using) in the crust.
Whisk eggs, sugar, butter, flour, vanilla, and salt. Pour over rhubarb.
Bake 45–50 minutes until custard is set (no jiggle!).
Cool 1 hour before slicing.
Notes
Add cinnamon for warmth.Swap rhubarb with apples in fall.Use a gluten-free crust for allergies.Top with whipped cream or ice cream.Freeze leftovers (if there are any!).
Nutrition
Calories: 400kcal
Rhubarb: The Unsung Hero of Spring
Rhubarb grows so fast in spring you can hear it creak! It’s packed with vitamin K and fiber, but never eat the leaves. they’re toxic. (Grandma warned me after my garden raid!)
Pro Tip: For extra red color, pick ruby-red rhubarb stalks. Green stalks work too. they’re just as tart!
Why This Recipe Works
The custard rhubarb pie recipe magic happens when the rhubarb’s sharpness softens into the sweet custard. Eggs and flour thicken the filling, while butter adds richness. Strawberries? They’re optional but add a juicy pop.
FAQs (Because We’ve All Got Questions)
Can I use frozen rhubarb?
Yes! Thaw and drain it first.
Why did my pie crack?
Overbaking! Pull it out when the center just sets.
Can I make mini pies?
Absolutely! Use muffin tins and reduce baking time.
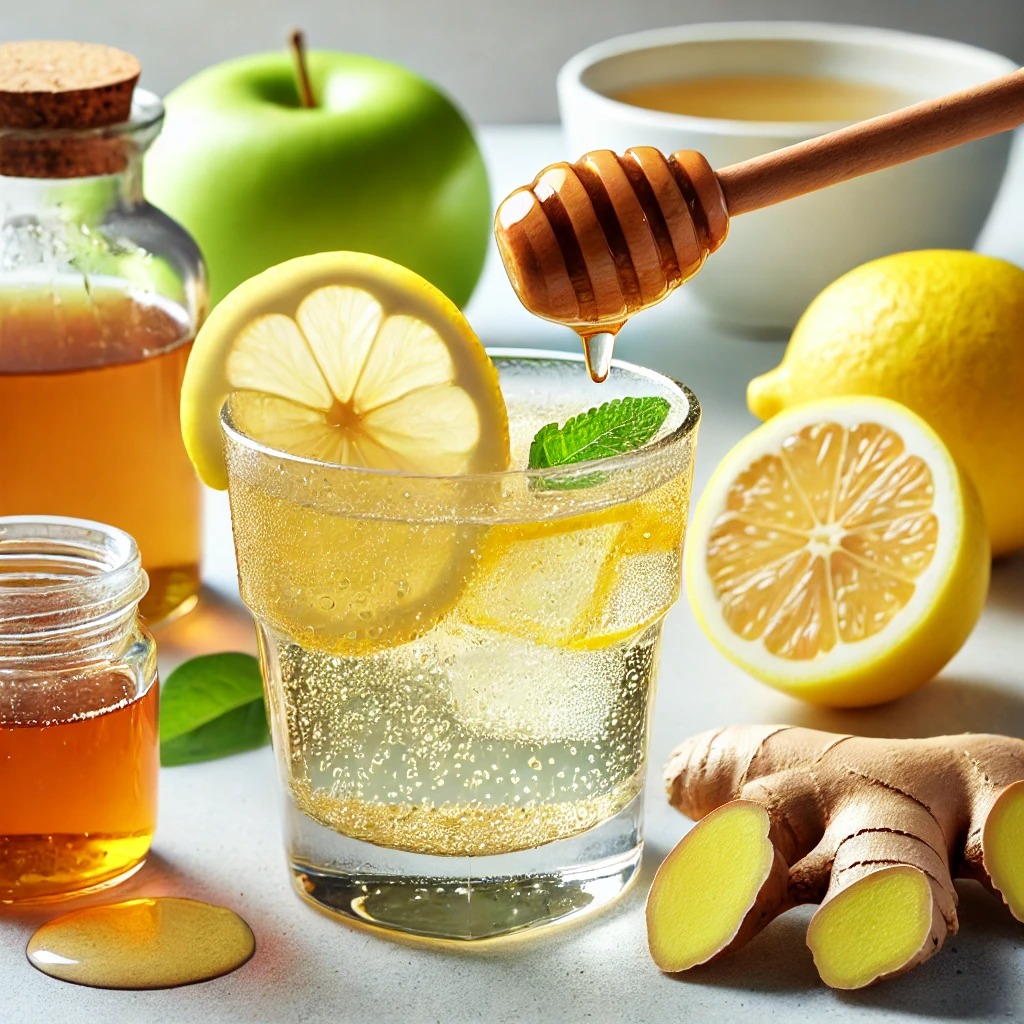
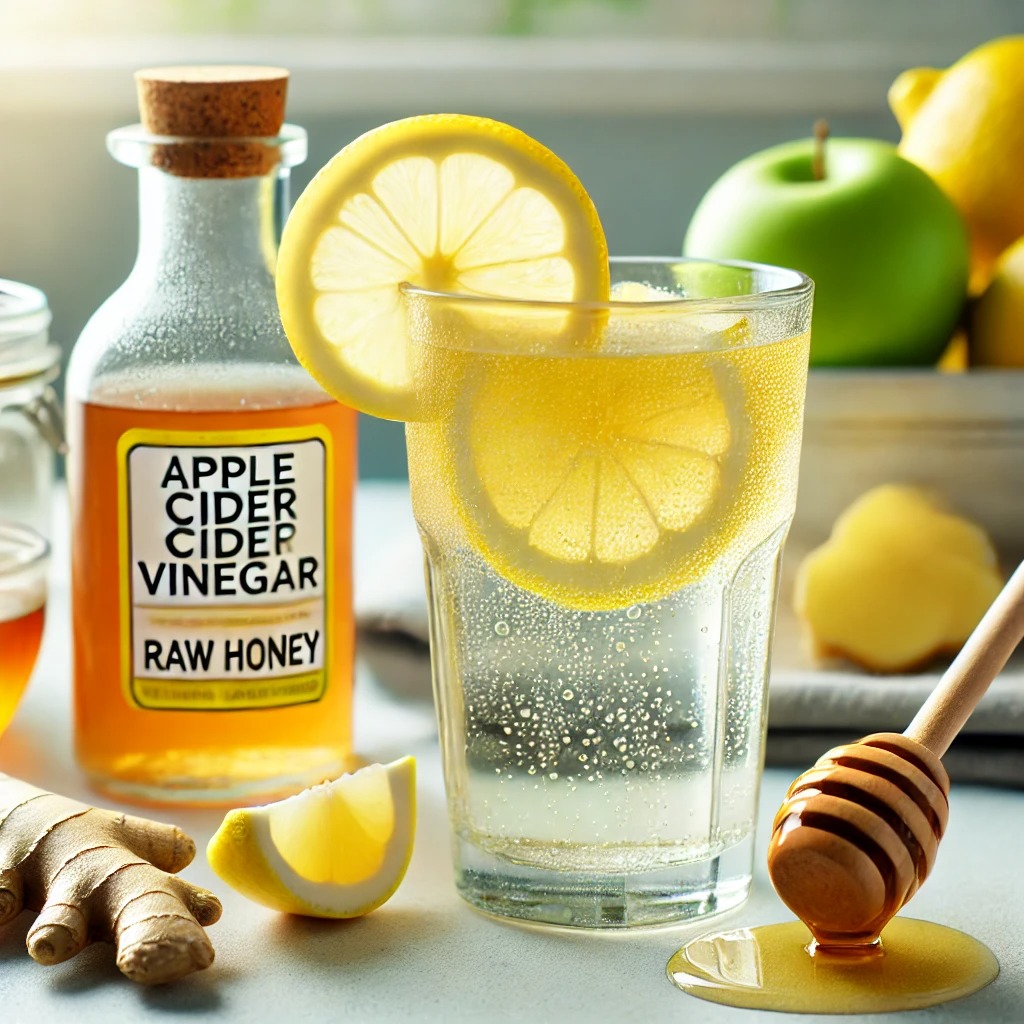
Someone sent a photo of a glowing purple drink and asked, “Have you tried this thing yet?” I hadn’t. It looked like something out of a fantasy movie, a glass of shimmering violet liquid. I learned it was made with butterfly pea flower, lemon, and apple cider vinegar, and that it had gone viral on TikTok, Instagram, and Pinterest. Suddenly, the phrase “natural Mounjaro” was popping up everywhere.
Curiosity took over.
But what is this homemade Mounjaro drink? Is it a gimmick? A real health boost? Or just a social media trend in a pretty glass?
Let’s unpack why this drink exploded, what people say it does, and how it fits into global wellness traditions.
First: What Is the “Mounjaro” Drink, Exactly?
Let’s clear this up right away: this drink has nothing to do with the prescription medication Mounjaro, used for managing blood sugar and weight.
Instead, the name “Mounjaro” in this context is an informal, modern nickname. It’s often understood as a reference to “climbing toward better health”—a nod to Mount Kilimanjaro. The drink itself is a natural herbal infusion that combines a few simple ingredients
What Each Ingredient Brings to the Table
Let’s break down the natural Mounjaro ingredients and their commonly believed benefits.
This Natural Mounjaro Recipe is a simple, refreshing drink made with just 4 ingredients: apple cider vinegar, lemon juice, ginger, and honey. Originating from Brazil, this homemade Mounjaro recipe is known for boosting metabolism, reducing cravings, and aiding weight loss. Perfect for busy mornings, it’s a natural, affordable, and effective way to kickstart your day.
Course Beverage, Drinks
Cuisine Brazilian, Health & Wellness
Keyword 4 ingredient natural mounjaro recipe, brazilian mounjaro recipe, Mounjaro recipe, natural mounjaro recipe for weight loss
Add ginger and honey, stir until the honey dissolves.
Pour in warm water and sip slowly (best enjoyed on an empty stomach!).
Notes
Add Mint: For a refreshing twist, add a few fresh mint leaves.
Use Lime: Swap lemon for lime for a tropical flavor.
Skip Honey: If you’re cutting sugar, omit honey or use stevia.
Add Cinnamon: A pinch of cinnamon can enhance flavor and boost metabolism.
Make it Iced: Chill the drink and serve over ice for a summer treat.
Nutrition
Calories: 10kcal
Sometimes ginger or honey is added. The color-shifting effect (from blue to purple) happens when the lemon changes the tea’s pH. The result? A visually stunning, refreshing, and easy-to-make wellness drink.
It may look trendy, but its roots run deep.
A Brazilian-Inspired Wellness Ritual?
While butterfly pea flowers originate in Southeast Asia, the version of this drink that’s taken over social media has cultural influences from South America, particularly Brazil.
There, herbal infusions and functional teas are part of daily life. The Brazilian Mounjaro recipe often includes:
Green tea (rich in antioxidants)
Ginger (for digestion and flavor)
Lemon or lime juice
Brazilians often skip sweeteners and drink this warm or chilled before meals. Many call it a daily ritual—simple, satisfying, and plant-powered. The brazilian mounjaro recipe with apple cider vinegar is a twist influenced by global wellness trends, blending traditional ingredients with modern ACV culture.
Japanese Mounjaro Recipe: A Calmer Take
The Japanese Mounjaro recipe is less about visual flash and more about inner balance. Popular among minimalist wellness followers, it’s a gentle combination of:
Warm water
Lemon juice
Grated ginger
Sometimes matcha or kelp extract
This natural Mounjaro tea recipe is light, grounding, and perfect for sipping between meals or as a mindful start to the day. No sweeteners, no caffeine jitters, just functional ingredients with a calming effect.
Most people already have some version of the ingredients at home. Whether you’re using green tea, butterfly pea flower, or lemon and ginger, this drink takes under 10 minutes to make.
2. The Color-Changing Magic Is Fun
Add lemon to butterfly pea flower tea, and it turns bright purple. It’s not just chemistry, it’s showmanship. This color play makes it a hit on Instagram and TikTok.
3. It Encourages Mindful Drinking
Instead of reaching for soda or energy drinks, more people are choosing intention, sipping a homemade drink with real ingredients.
4. It’s Customizable
One day it’s minty and iced. The next day it’s warm with turmeric and cinnamon. The natural Mounjaro 4 ingredient recipe evolves with your mood.
Social Media: The Spark Behind the Fire
This drink didn’t go viral because of a celebrity sponsorship. It spread because it’s fun to make, looks beautiful, and feels good to drink.
Use fresh lemon juice for the best flavor.Raw honey is preferred for its natural enzymes.Adjust ginger quantity if you prefer a milder taste.
Nutrition
Calories: 10kcal
Pinterest users pinned it as a DIY detox elixir
TikTok creators showcased it in “morning routine” and “gut health” videos
Instagram wellness influencers highlighted its color-changing effect
Unlike many trends, this one sticks because it feels real, something you can do today without buying anything new.
Where People Are Finding the Ingredients
It doesn’t take a specialty store to get started:
Butterfly pea flowers: Buy online (Amazon, Mountain Rose Herbs, or local herb shops)
Apple cider vinegar: Available at any grocery store (go for unfiltered)
Lemons: Fresh is best, but bottled organic lemon juice is a backup
Ginger: Fresh root, powdered, or even tea bags all work
Some people even prep natural Mounjaro ingredients into a concentrate and store it for the week.
Creative Ways to Make It Your Own
Here’s how people around the world are remixing the natural Mounjaro drink recipe:
Tropical Vibe
Add pineapple juice or orange slices. Great cold on a summer day.
Immunity Kick
Add turmeric and black pepper to warm water with lemon and ginger.
Post-Workout Twist
Stir in a scoop of collagen or plant protein with chilled green tea and citrus.
Berry Splash
Muddle blueberries or raspberries for extra antioxidants and flavor.
Spa-Style Iced Version
Serve over ice with cucumber slices, mint, and sparkling water.
What Real People Are Saying
Thousands of comments across social platforms echo the same thing:
“It’s not a miracle, but I drink less soda now.” “Swapped my second coffee for this. I feel less jittery.” “Tastes refreshing and keeps me full between meals.” “It’s simple, it’s natural, and I actually like how it tastes.” “My skin feels better, but maybe that’s just from hydrating more.”
Are these clinical results? No. But they point to a bigger truth: sometimes small habits create big shifts.
⚠️ A Quick Reality Check
Let’s not oversell it.
The natural Mounjaro recipe for weight loss is not a substitute for medication, a fat-burning miracle, or a cure-all.
It’s a refreshing tea. A feel-good ritual. And for many, a gateway to drinking more water, reducing processed drinks, and engaging with their health in a grounded way.
Final Take: Why This Drink Might Be Worth Adding to Your Routine
It costs under a dollar per serving. It takes under five minutes to make. It adapts to your taste, mood, and goals.
Whether you’re drawn to the Brazilian simplicity, the Japanese calm, or the internet’s obsession with that purple glow, this drink has something going for it: consistency.
It’s not about perfection. It’s about one small, enjoyable choice at a time.
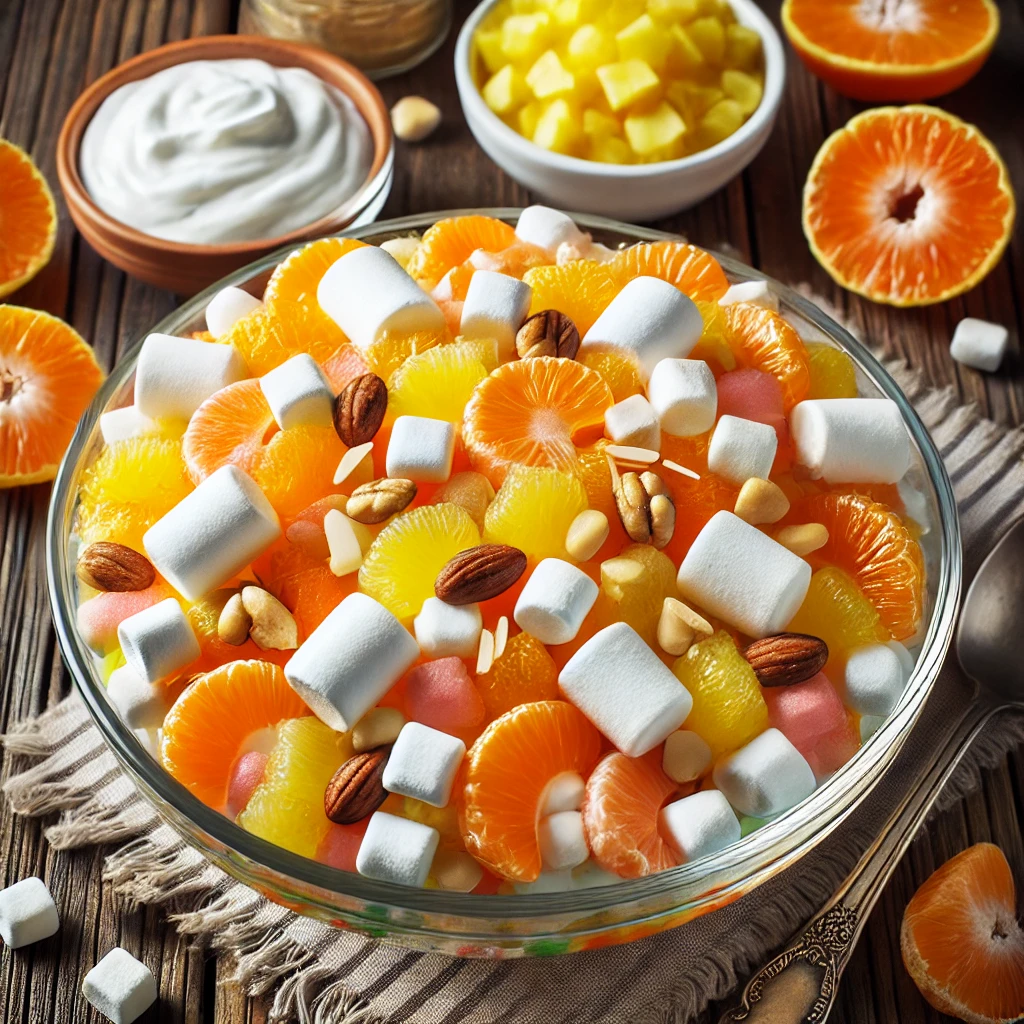
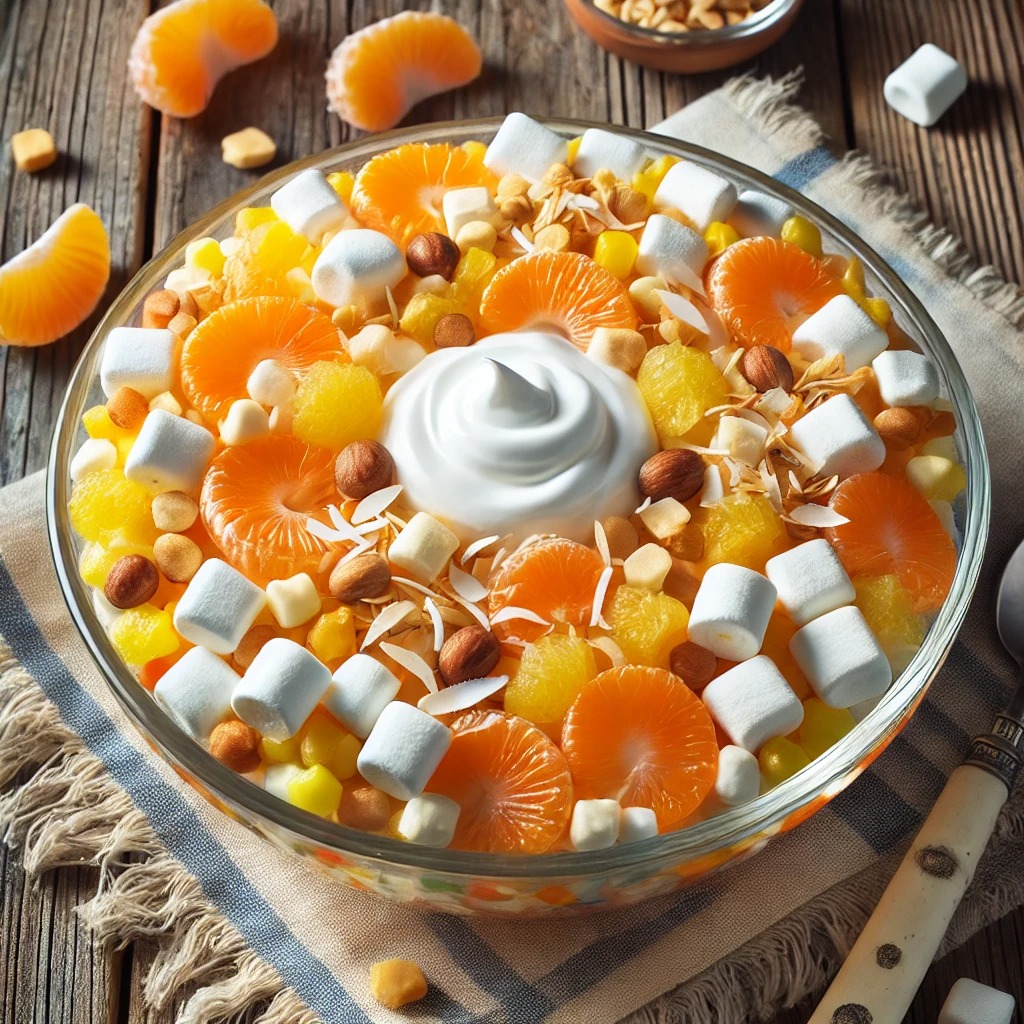
There’s something about old-school potluck recipes that just hits different, especially when they’re creamy, colorful, and brimming with childhood memories. That’s exactly what this Old-Fashioned 7 Cup Salad delivers: a sweet, tangy, fluffy bowl of joy that takes five minutes to mix and somehow disappears even faster.
Where It All Began
For me, 7 Cup Salad isn’t just a retro dessert, it’s a family heirloom. I was maybe seven or eight the first time my grandma handed me a tiny dessert dish filled with this pastel-colored fluff. I had no clue what was in it, but I remember asking for seconds before I’d even finished the first bite. Years later, I inherited her old recipe card: smudged ink, a grease stain, and that unmistakable note at the top , “1 cup of everything.”
This isn’t food for impressing strangers. It’s for reminding yourself that simple is often best.
What Is 7 Cup Salad, Anyway?
At its heart, it’s a chilled fruit salad that brings together pantry staples , no baking, no blender, and no fancy prep. It’s made of exactly seven ingredients, each measured at one cup, and mixed together with a rubber spatula. No measuring anxiety. No cooking skills required.
But don’t mistake simplicity for boring. This salad is loaded with texture and flavor — creamy, chewy, crunchy, juicy, and sweet all at once.
The Seven Cups That Make the Magic
Here’s what goes into the classic version:
1 cup mandarin oranges (drained) – bright, juicy sweetness
1 cup pineapple tidbits (also drained) – adds a tart tropical kick
1 cup shredded sweetened coconut – soft, chewy texture with a touch of sugar
1 cup mini marshmallows – fluffy, creamy pillows that soak up all the flavor
1 cup sour cream – the tangy base that ties it all together
1 cup maraschino cherries (halved) – pops of color and syrupy sweetness
1 cup chopped pecans – for crunch and a toasty finish
Mix It Up (Literally)
Grab a large bowl.
Toss everything in.
Gently fold with a spatula until everything is evenly coated.
Cover and chill for at least an hour (or overnight — even better).
That’s it.
Want to go extra nostalgic? Serve it in little glass dessert cups and top with a cherry.
Why It Still Works Today
This dish may scream 1960s, but it hasn’t gone out of style for one simple reason — it’s comforting, and comfort never expires. It’s also crazy flexible:
Swap sour cream for Greek yogurt or Cool Whip
Use walnuts, almonds, or skip the nuts altogether
Try canned peaches, grapes, or fresh strawberries
Vegan? Use plant-based yogurt and vegan marshmallows
You can twist it any way you like, and it’ll still taste like home.
Make-Ahead & Storage
Best served cold, after a few hours of chilling
Can be made up to 24 hours ahead
Store in a sealed container in the fridge for up to 3 days
Not freezer-friendly (texture will go weird)
Texture Tips
Drain your canned fruit well – soggy salad isn’t fun
Fold, don’t stir – gentle motion keeps the fruit intact
Chill time matters – gives marshmallows time to soften and flavors to blend
Modern Variations to Try
Tropical Remix: Add chopped mango or banana
Berry Delight: Toss in blueberries or raspberries
Apple Pie Style: Sub in apples, cinnamon, and a pinch of nutmeg
Chocolate lovers: Sprinkle in mini chocolate chips or crushed Oreos
Nutrition Snapshot (1 of 8 servings, approx.)
Calories: ~280
Fat: 14g
Carbs: 35g
Sugar: 28g
Protein: 3g
Fiber: 2g
Final Thoughts
This 7 Cup Salad isn’t fancy. It’s not trendy. But it’s real, it’s nostalgic, and it gets scraped clean every time I bring it to a get-together. If you’ve never tried it, give it a go. If you grew up with it, maybe it’s time to make it again.
It’s one of those “no-recipe recipes” that doesn’t need modern reinvention — just a big bowl and a willingness to enjoy something a little silly, a little sweet, and a whole lot comforting.
What Is 7 Cup Salad?
At its core, 7 Cup Salad is a creamy, chilled fruit salad made with a combination of:
Canned fruit (like pineapple and mandarin oranges)
Marshmallows
Sour cream
Coconut
Cherries
Nuts (usually pecans)
It’s no-cook, highly customizable, and made for potlucks, holidays, BBQs, and midweek sweet cravings. You can whip it up in under 15 minutes and let the fridge do the rest.
Why You’ll Love This Recipe
No oven, no fuss: You don’t even need a mixer, just a spoon and a bowl.
Nostalgic and fun: A classic from the 60s–70s that still holds up today.
Flexible for any crowd: Easily made vegan, nut-free, or low-sugar.
Make-ahead magic: Actually tastes better after a few hours in the fridge.
If you love vintage dishes like Ambrosia salad or Watergate salad, this is your next obsession.
A vintage fruit salad with fluffy marshmallows, juicy pineapple, and a creamy sour cream base. Ready in 15 minutes!
Course Dessert
Cuisine American
Keyword 7 cup fruit salad recipe, 7 cup salad recipe, recipe for 7 cup salad
Prep Time 15 minutesminutes
Total Time 15 minutesminutes
Servings 8
Calories 280kcal
Cost 12
Equipment
Large mixing bowl
Rubber spatula
measuring cups
Ingredients
1cupmandarin orangesdrained
1cuppineapple tidbitsdrained
1cupshredded coconutsweetened
1cupmini marshmallows
1cupsour creamfull-fat for best texture
1cupmaraschino cherrieshalved, reserve 4 for garnish
1cupchopped pecanstoasted
Instructions
In a large bowl, gently fold all ingredients until fully combined.
Chill for 1 hour to let flavors meld.
Garnish with cherries and serve cold.
Notes
Swap sour cream for Greek yogurt for a tangier twist.Toast pecans in a dry skillet for 2 minutes to enhance flavor.Add ½ tsp vanilla extract for extra depth.Use fresh pineapple for a brighter taste (drain well!).Make it ahead: Tastes even better after 24 hours!
Nutrition
Calories: 280kcal
Common Substitutions & Modern Twists
Want to mix it up? Try these creative swaps:
Cool Whip instead of sour cream = fluffier, sweeter result.
Plain Greek yogurt = tangier flavor + protein boost.
Crushed pretzels instead of coconut = salty-sweet combo!
Canned peaches for oranges = softer, syrupy sweetness.
Here’s how you get that ideal soft-but-fluffy texture:
Drain all canned fruits thoroughly—then press gently between paper towels.
Gently fold ingredients with a silicone spatula, not a metal spoon. Avoid stirring vigorously—it’ll break the fruit.
Chill at least 1 hour (overnight is even better).
Serve cold—this is not a room-temp dish!
Add-Ins & Customization Ideas
Turn your 7 Cup Salad into a creative masterpiece with these fun variations:
🧁 Dessert Parfaits: Layer the salad with crushed graham crackers and whipped cream in mason jars.
🥥 Tropical Twist: Add chopped mango and use coconut cream instead of sour cream.
🍏 Fall Version: Add diced apples, cinnamon, and swap cherries for dried cranberries.
🥭 Summer Berry Mix: Throw in blueberries, strawberries, or raspberries for a seasonal upgrade.
🍫 Sweet Tooth Special: Toss in mini chocolate chips or drizzle with caramel.
Make-Ahead Tips
One of the best things about this salad? It gets better with time.
Chill for at least 1 hour before serving
Can be made 24 hours ahead—flavors deepen and textures blend beautifully
Store in an airtight container for up to 3 days in the fridge
Just stir gently before serving and garnish with a few fresh cherries or a sprinkle of toasted coconut.
Nutritional Snapshot (Per Serving, Approx.)
Nutrient
Amount (1/8 serving)
Calories
280 kcal
Total Fat
14 g
Saturated Fat
8 g
Cholesterol
45 mg
Sodium
230 mg
Total Carbohydrates
35 g
Dietary Fiber
2 g
Sugars
28 g
Protein
3 g
Note: Values will vary depending on brands and exact measurements.
FAQS About 7 Cup Salad
Can I make this ahead of time?
Absolutely! In fact, it tastes even better the next day.
Can I freeze it?
Not recommended. The texture of the fruit and cream changes dramatically after freezing.
What if I don’t like coconut?
Try subbing in crushed graham crackers, chopped apples, or even oats for texture.
Is this gluten-free?
Yes—as long as your marshmallows and sour cream are certified GF.
Why This Vintage Salad Still Matters
Recipes like this stick around for a reason.
They’re made from humble pantry staples. They feel like something your grandma would pull from the fridge in a casserole dish. They’re low-effort but high impact, perfect for a generation that wants comfort food without turning on the stove.
It’s nostalgic. It’s flexible. It’s oddly satisfying. And yes, it will absolutely disappear from your table faster than anything else.
Final Thoughts: Dessert With Heart
The 7 Cup Salad recipe isn’t just about convenience or sweetness. It’s about connection. It’s a dessert that tells a story, passed from one hand to another over generations.
Whether you’re bringing it to your first potluck or recreating it for your kids, it’s the kind of treat that says: “I remember, and I want to share that with you.”
So grab a bowl, gather your 7 ingredients, and mix up some magic. You might just find it becomes your new family tradition.
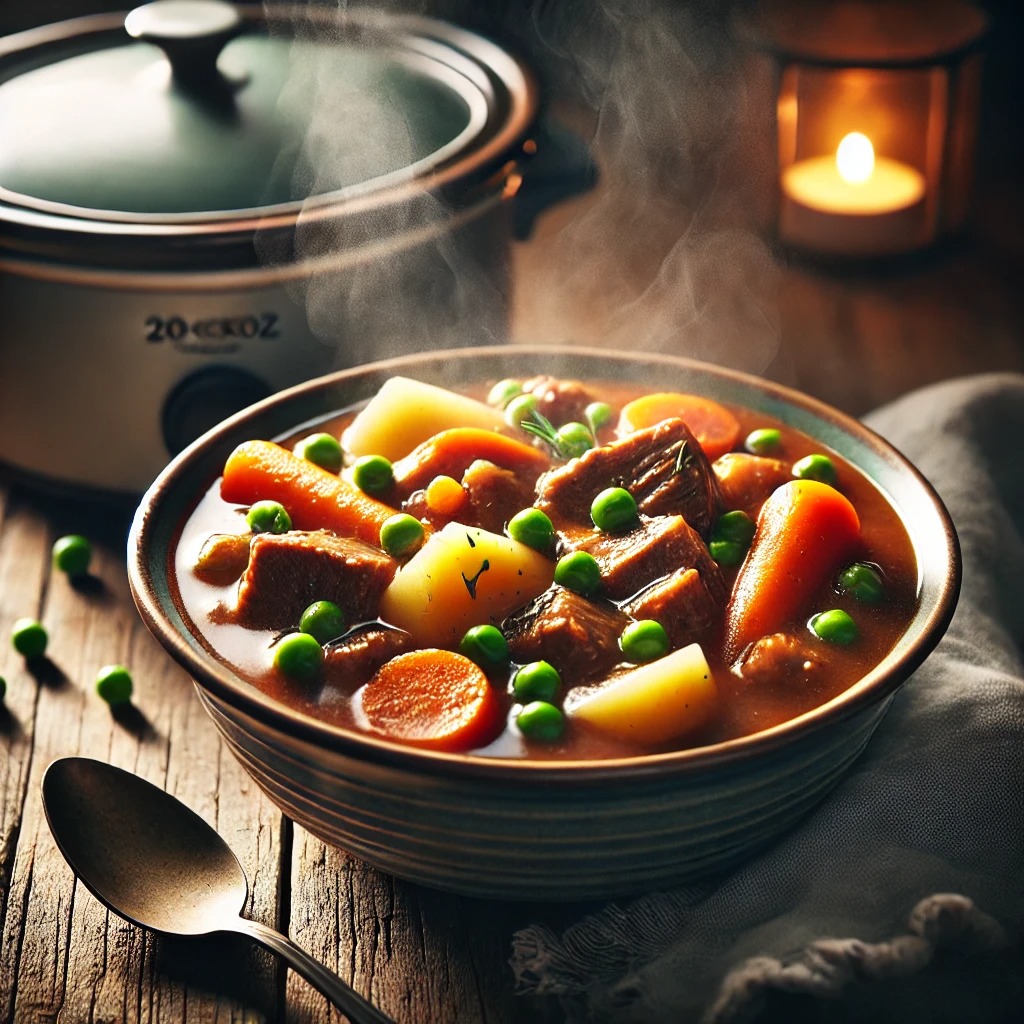
There’s something oddly satisfying about coming home to a hot, home-cooked meal, especially when all you had to do was toss a few ingredients into your mini crock pot and walk away.
If you’ve got a 20 oz crock pot (yes, the tiny one!), you already know it’s perfect for single servings, quick lunches, or small-batch sides. What you might not know is just how much you can actually cook in it.
Forget boring reheated leftovers, these compact slow cookers are made for real food, fresh flavor, and seriously easy cleanup. Whether you’re cooking for yourself, meal prepping smart, or trying to avoid food waste, here’s how to make the most of that little wonder on your counter.
Why Use a 20 oz Crock Pot?
This mini version of the classic slow cooker is great for:
Solo meals without the bulk
Dorm rooms or office lunches
Quick sides or warm dips
Portion control and less food waste
Plus, it’s energy-efficient and takes up very little space.
Tips for Cooking Small but Smart
Layer wisely: Meats at the bottom, grains/starches next, veggies on top.
Don’t overfill: Stick to the max fill line, it matters more with small cookers.
Less liquid: Mini crock pots need less broth or water than full-size ones.
Hands off the lid: Every peek adds time. Let it do its thing.
5 Tried-and-True 20 oz Crock Pot Recipes
These aren’t just scaled-down big recipes, they’re tailor-made for small slow cookers.
Instructions: Layer chicken, rice, and broth with seasonings. Cook on low for 4 hours. Add peas & carrots in the last 30 mins. Optional: stir in a splash of cream before serving.
2. Mini Beef Stew
Ingredients:
1/4 lb beef stew meat
1/2 cup diced potatoes
1/4 cup chopped carrots
1/4 cup chopped onion
3/4 cup beef broth
Dash of Worcestershire sauce
Instructions: Add all ingredients and cook on low for 5–6 hours. For a thicker stew, mash a few potatoes near the end.
3. Vegetarian Chili
Ingredients:
1/4 cup black beans
1/4 cup kidney beans
1/2 cup diced tomatoes
2 tbsp corn
1 tbsp chopped bell pepper
Chili powder, cumin, garlic powder to taste
Instructions: Combine all ingredients. Cook on low 4–5 hours. Top with cheese or avocado if desired.
Summary: A flavorful and easy-to-make meal for small portions, cooked effortlessly in a mini slow cooker.
Course Main Course
Cuisine American
Keyword 20 oz crock pot recipes, recipes for 20 oz crock pot
Prep Time 5 minutesminutes
Cook Time 4 hourshours
Total Time 4 hourshours5 minutesminutes
Servings 1
Calories 320kcal
Cost 5
Equipment
20 oz crock pot
measuring cups
spoon
Ingredients
1bonelessskinless chicken breast (cubed)
½cupuncooked rice
1cupchicken broth
½teaspoongarlic powder
½teaspoononion powder
¼teaspoonsalt
¼teaspoonpepper
½cupfrozen peas and carrots
Instructions
Place the chicken pieces at the bottom of the 20 oz crock pot.
Add uncooked rice, chicken broth, and seasonings.
Cover and cook on low for 4-5 hours or high for 2-3 hours.
Stir in frozen peas and carrots 30 minutes before serving.
Notes
Add cream for a creamy texture.
Try different seasoning blends for variety.
Use brown rice for added fiber.
Garnish with fresh herbs for extra flavor.
Store properly for best freshness.
Nutrition
Calories: 320kcal
Instructions: Mix all ingredients and heat on low until bubbly (about 1.5 hours). Serve with chips or celery.
Creative Customizations
Tex-Mex Chicken: Use taco seasoning, add corn & beans.
Mediterranean Lentils: Add olives, sun-dried tomatoes, herbs.
Thai Peanut Noodles: Use ramen, peanut butter, soy sauce, and shredded carrots.
Fall Dessert: Cook diced apples with oats, cinnamon, and honey for a single-serve crisp.
Reheat slowly to maintain moisture (add a splash of broth or water if needed).
Mini Crock Pot FAQ
Can I cook pasta in it? Yes — but add it in the last 30 minutes or it may get mushy.
Can I cook from frozen? It’s best to thaw meats first for safety and even cooking.
Can I bake in it? Technically, yes! Some users make mini cakes, though results vary.
Best protein? Chicken breast, ground beef, lentils, and even eggs work great.
How do I clean it? Soak with warm soapy water — most inserts are nonstick or ceramic.
Final Thoughts
Whether you’re cooking solo or just trying to simplify mealtime, the 20 oz crock pot is a tiny powerhouse that proves small-batch cooking doesn’t mean small flavor. Start with one of these recipes, tweak it to your taste, and you might just wonder why you ever needed a full-size slow cooker in the first place.
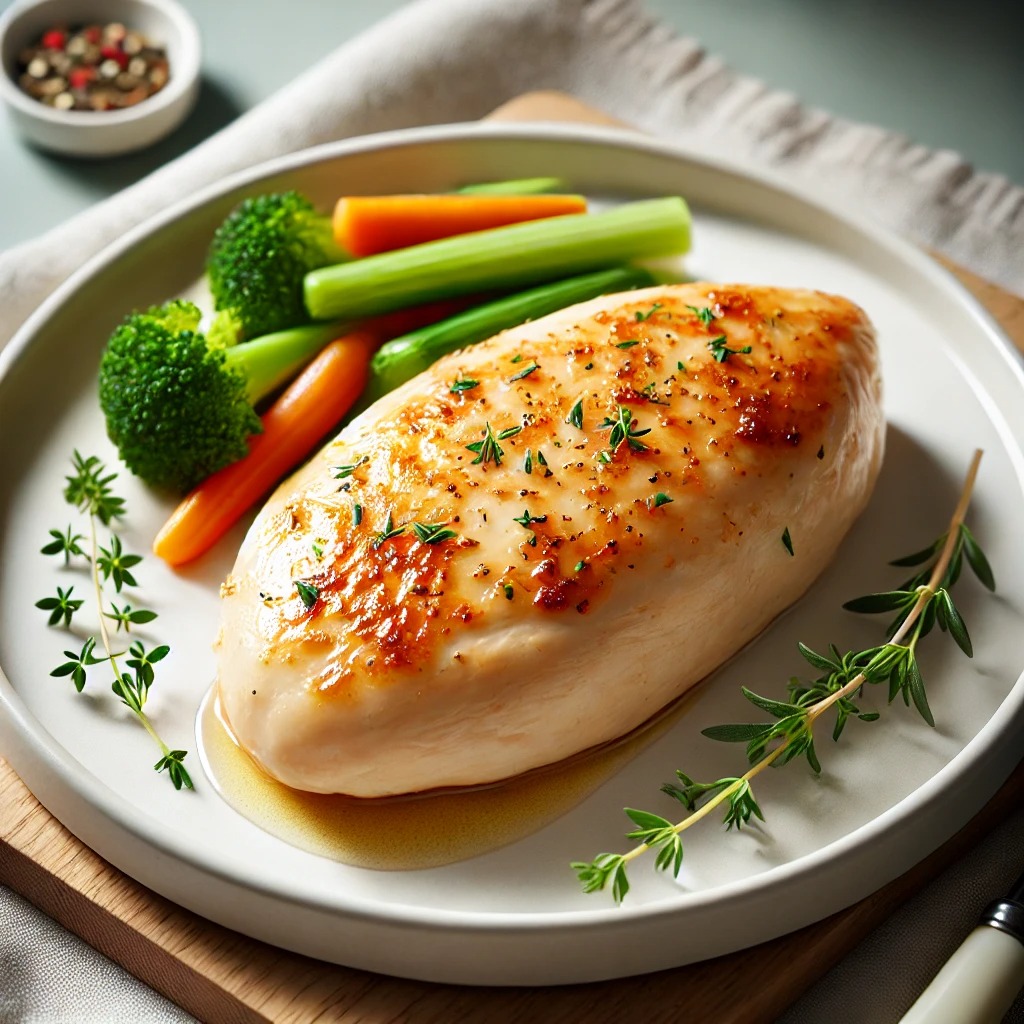
Imagine the perfect crunch, a burst of flavor, and a healthier twist on your favorite fried chicken dish—all achieved in your air fryer. Today, we’re diving into the secrets behind crafting the ultimate Crispy Air Fryer Breaded Chicken Breast. In this post, you’ll learn everything from the origins of this modern classic to step-by-step instructions and expert tips that bring restaurant-quality results to your home kitchen.
What is Crispy Air Fryer Breaded Chicken Breast?
The Crispy Air Fryer Breaded Chicken Breast is a delightful twist on traditional fried chicken. This dish features tender chicken breasts enveloped in a seasoned, crunchy breading that crisps beautifully in an air fryer. It’s an innovative take on a classic comfort food, designed to offer all the flavor and crunch of deep-fried chicken but with less oil and fewer calories.
Understanding the Essence of Crispy Air Fryer Breaded Chicken Breast
Historically, fried chicken has been a staple in many cultures, cherished for its satisfying crunch and savory flavor. The Crispy Air Fryer Breaded Chicken Breast takes this heritage and transforms it with modern, healthier techniques. By using an air fryer, we celebrate both tradition and innovation, preserving the cultural significance of crispy chicken while catering to today’s health-conscious diners. This dish also highlights the creative evolution of breaded recipes, blending culinary art with kitchen technology.
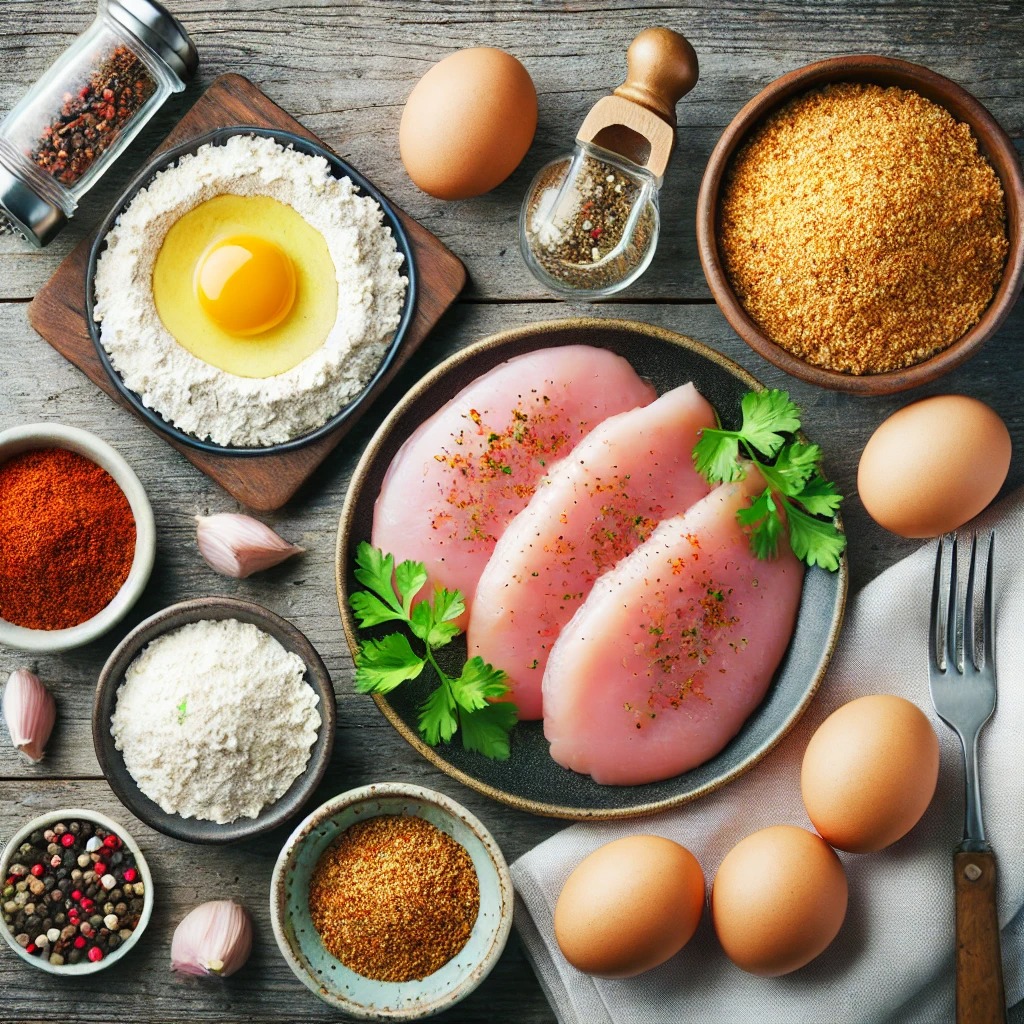
Crafting the Perfect Crispy Air Fryer Breaded Chicken Breast
Creating this dish is both an art and a science. Start with quality chicken breasts, and ensure they’re patted dry to help the breading adhere. Here’s a simplified guide:
Prep the Chicken: Pound the chicken to an even thickness for uniform cooking.
Season and Dredge: Season the chicken breasts, then dip them in beaten eggs and coat with a seasoned mixture of breadcrumbs, herbs, and a touch of Parmesan.
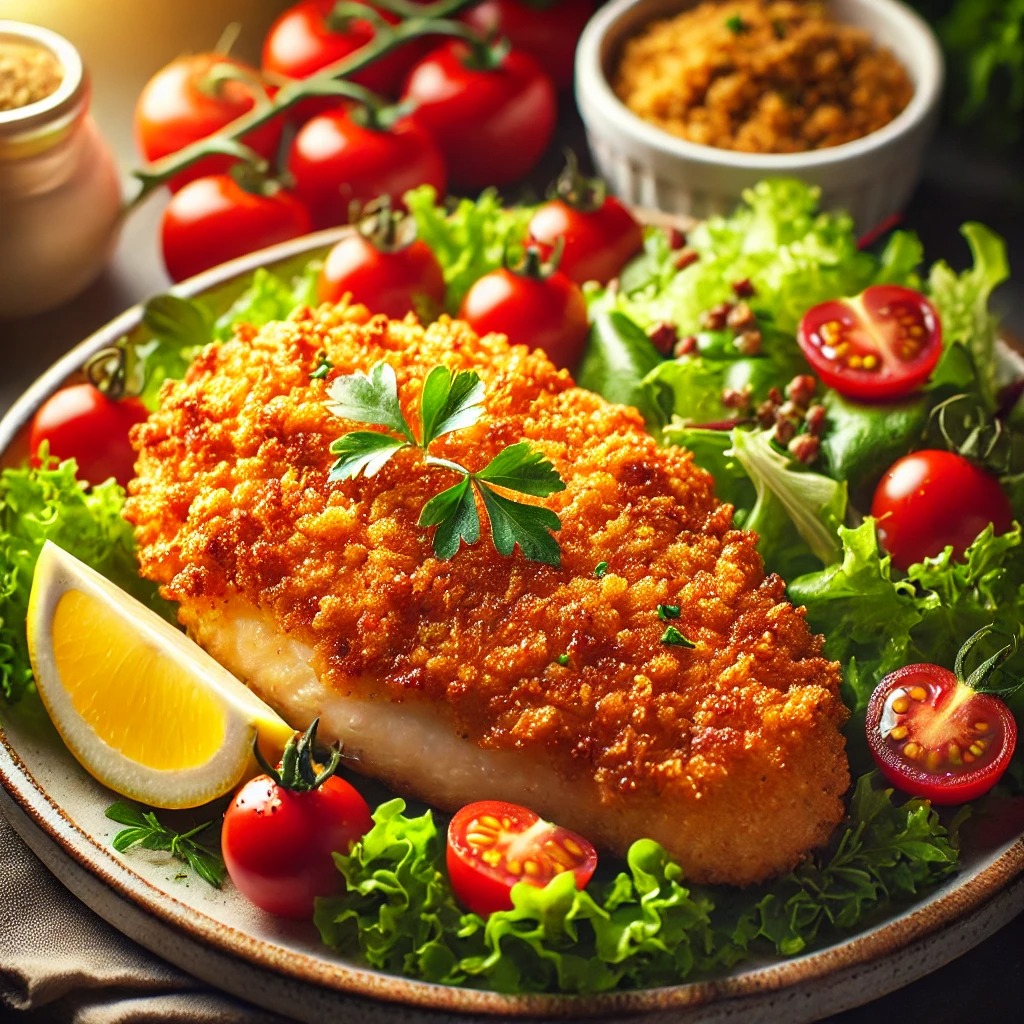
Air Fry: Preheat your air fryer to 400°F (200°C). Place the chicken in a single layer and cook for 10–12 minutes, flipping halfway through.
Check for Doneness: The internal temperature should reach 165°F (74°C).
Common pitfalls include over-breading (which can lead to sogginess) or undercooking the center. Following these steps ensures a perfectly balanced crunch every time.
Creating the Signature Crispy Air Fryer Breaded Chicken Breast
Personalize your Crispy Air Fryer Breaded Chicken Breast by experimenting with your favorite spices and herbs. Consider adding smoked paprika or garlic powder for extra depth. For a unique twist, mix in finely grated lemon zest or substitute some breadcrumbs with crushed cornflakes for an added crunch. These small modifications can transform the dish into a signature recipe that reflects your culinary style.
Expert Tips for Success
Preheat the Air Fryer: A hot air fryer ensures an even, crispy coating.
Even Coating: Ensure every inch of the chicken is well-covered to lock in moisture.
Avoid Crowding: Cook in batches if necessary; overcrowding can lead to steaming rather than frying.
Use a Thermometer: Verify the internal temperature to prevent undercooking.
Rest Before Serving: Let the chicken rest a few minutes after air frying for optimal juiciness.
Discover a healthier way to enjoy fried chicken with this crispy, flavorful, and easy-to-make air fryer recipe. Perfect for a quick weeknight dinner or a delightful weekend treat.
Course Main Course
Cuisine American
Keyword air fryer breaded chicken breast, breaded chicken cutlets in air fryer, breaded chicken in air fryer, Crispy Air Fryer Breaded Chicken Breast
Prep Time 10 minutesminutes
Cook Time 12 minutesminutes
Resting time 2 minutesminutes
Total Time 24 minutesminutes
Servings 2
Calories 320kcal
Cost 10
Equipment
Air Fryer
Meat thermometer
Shallow bowls for dredging
Tongs
Kitchen timer
Ingredients
2bonelessskinless chicken breasts
2eggsbeaten
1cupbreadcrumbsor panko
½cupgrated Parmesan cheese
1tspgarlic powder
1tspsmoked paprika
Salt and pepper to taste
Optional: ½ cup crushed cornflakes
Instructions
Flatten chicken breasts to an even thickness.
Season both sides with salt, pepper, garlic powder, and smoked paprika.
Dip each breast in beaten eggs, then coat thoroughly in the breadcrumb mixture.
Preheat air fryer to 400°F (200°C).
Place chicken in the basket in a single layer.
Air fry for 10–12 minutes, flipping halfway through, until the internal temperature reaches 165°F (74°C).
Notes
Use panko breadcrumbs for extra crunch.
Avoid overcrowding for even cooking.
Try adding lemon zest for a fresh twist.
Substitute part of the breadcrumbs with crushed cornflakes for a unique texture.
Let the chicken rest briefly after cooking to retain juiciness.
Nutrition
Calories: 320kcal
Serving Suggestions and Pairings
Serve your Crispy Air Fryer Breaded Chicken Breast with a refreshing side salad, steamed vegetables, or even crispy sweet potato fries. A tangy dipping sauce like garlic aioli or spicy sriracha mayo perfectly complements the crunch. For a beverage pairing, consider a light white wine or an ice-cold craft beer to balance the flavors.
Storage Information
Room Temperature:
The chicken should not be stored at room temperature for more than 2 hours to avoid food safety issues.
Refrigeration:
Store in an airtight container for up to 3 days in the fridge. Reheat in the air fryer to retain crispiness.
Other Storage Tips:
For longer storage, freeze the chicken. Wrap each piece individually in plastic wrap, then place in a freezer bag. It will maintain quality for up to 2 months. Reheat in the air fryer directly from frozen for a crisp finish.
Nutrition Facts
Nutrient
Amount per Serving
Calories
320
Protein
35g
Carbohydrates
20g
Fat
12g
Fiber
3g
Conclusion
The Crispy Air Fryer Breaded Chicken Breast is more than just a recipe—it’s a culinary journey that marries classic comfort with modern, healthier cooking techniques. From understanding its cultural roots to perfecting your own version with expert tips, this dish is sure to impress at any table. Ready to elevate your weeknight dinners? Give this recipe a try and share your delicious results!
FAQ
Can I use chicken thighs instead of breasts?
Yes, but adjust the cooking time. Thighs may need a few extra minutes to reach the ideal internal temperature.
How do I ensure the breading sticks to the chicken?
Make sure the chicken is patted dry before seasoning and dredging, and use a light, even coating of egg wash.
What type of breadcrumbs is best?
Panko breadcrumbs work well for a super crunchy texture, though traditional breadcrumbs offer a denser coating.
Can I double the recipe for meal prep?
Absolutely. Just be careful not to overcrowd the air fryer; cook in batches for the best results.
How do I reheat the chicken to maintain crispiness?
Reheat in the air fryer at 350°F (175°C) for 3-5 minutes, rather than using a microwave, to keep the coating crispy.
Tired of the same old pasta and pancakes? It’s time to shake up your recipe routine with dishes that are bold, unexpected, and seriously delicious.
These 10 under-the-radar recipes from around the world are packed with personality and they’re probably not on your usual dinner rotation.
From savory Turkish street food to vibrant Filipino desserts, this lineup covers every craving. Best of all? These recipes aren’t just eye-catching, they are doable at home.
1. Turkish Pide with Spiced Lamb and Feta
Think pizza, but with a twist: boat-shaped dough, tender spiced lamb, and tangy feta. It’s savory, aromatic, and totally addictive.
If you love bold flavors, you haven’t lived until you’ve tried these. Crisp puris are filled with spicy, tangy tamarind water.
Highlights:
Combines heat, sourness, and crunch in every bite
Great party starter or snack
6. Swedish Kanelbullar (Cinnamon Buns)
Cinnamon rolls, but fluffier and more aromatic thanks to a hint of cardamom.
Pro Tip:
Let the dough rise slowly to enhance the texture and flavor.
Serve with a cup of coffee for the full Scandinavian vibe.
7. Brazilian Coxinha (Chicken Croquettes)
Golden, crispy, and filled with creamy shredded chicken. These are the snack you didn’t know you needed.
Fun Fact:
The name “coxinha” means “little thigh” in Portuguese—they’re shaped like mini drumsticks!
8. Moroccan Mint Tea
It’s not just tea—it’s a ritual. Brewed with fresh mint and sugar, this drink is as refreshing as it is beautiful.
Serve It:
Poured from a height into small glasses for froth and flair.
9. Filipino Halo-Halo
A summer dessert masterpiece. It combines shaved ice, sweet beans, jellies, and tropical fruits all layered with ice cream.
Flavor Explosion:
Sweet, creamy, fruity, and icy in one spoonful.
10. Mexican Elote (Grilled Street Corn)
Corn on the cob taken to another level: charred, slathered in mayo, sprinkled with chili and cotija cheese, and hit with lime juice.
Why It Works:
That combo of smoky, creamy, spicy, and tangy just hits.
Nutrition at a Glance (Per Serving Approx.)
Recipe
Calories
Protein
Carbs
Fat
Sugar
Fiber
Turkish Pide
420
22g
45g
18g
4g
3g
Japanese Soufflé Pancakes
260
6g
35g
10g
14g
1g
Korean Fire Chicken
380
35g
12g
22g
6g
2g
Vietnamese Egg Coffee
180
4g
15g
10g
12g
0g
Indian Pani Puri
150
3g
30g
2g
8g
5g
Swedish Kanelbullar
290
5g
40g
12g
18g
2g
Brazilian Coxinha
320
15g
30g
16g
3g
2g
Moroccan Mint Tea
40
0g
10g
0g
10g
0g
Filipino Halo-Halo
350
6g
60g
12g
35g
3g
Mexican Elote
210
6g
25g
10g
5g
3g
Final Thoughts
These dishes aren’t just different, they’re memorable. If you’re bored with your usual weekly menu, challenge yourself to try just one of these. You might discover a new go-to or impress someone with flavors they’ve never tasted before.
And let’s be real — food this fun is meant to be shared.
Would you like me to format this into a Pinterest-friendly visual or WP Recipe Maker post set next?
How is Turkish Pide different from regular pizza?
Turkish Pide has a thinner, boat-shaped crust and is traditionally topped with spiced meats and cheeses, giving it a unique texture and flavor.
Why are Japanese Soufflé Pancakes so fluffy?
These pancakes get their signature fluffiness from whipped egg whites (meringue), which create an airy, cloud-like texture when cooked slowly.
Is Korean Fire Chicken (Buldak) very spicy?
Yes, it’s extremely spicy due to gochujang (Korean chili paste) and gochugaru (chili flakes). You can reduce the spice by using less of these ingredients.
Does Vietnamese Egg Coffee taste like eggs?
Not really! The whipped egg yolk and condensed milk create a creamy, custard-like foam that enhances the strong coffee without an eggy taste.
How do I keep Pani Puri crispy?
Store them in an airtight container at room temperature. Avoid exposure to moisture to prevent them from turning soggy.
Can I make Swedish Kanelbullar without cardamom?
Yes, but cardamom is a key ingredient that gives them their distinct flavor. If unavailable, try using cinnamon or nutmeg instead.
What’s the best dipping sauce for Brazilian Coxinha?
Brazilian Coxinha pairs well with spicy mayo, chimichurri, or even a simple garlic aioli for extra flavor.
Food lovers, brace yourselves! Popeyes has done it again, teaming up with Tequila Don Julio to bring an irresistible twist to fast food. If you thought Popeyes’ fried chicken couldn’t get any better, their Popeyes x Tequila Don Julio Reposado Flavored Concha Roll Chicken Sandwich and Louisiana Garlic 3-Piece Wings will prove you wrong. This bold collaboration blends the flavors of premium tequila with Popeyes’ signature Southern-style cooking, creating a unique culinary experience that’s both indulgent and unexpected.
In this post, we’ll dive into what makes this collaboration so special, explore the flavors behind these exclusive menu items, and even break down how you can recreate a similar taste at home. Let’s get started!
What is Popeyes Don Julio?
Popeyes’ latest limited-time offering pairs the brand’s famous fried chicken with the distinct, smooth taste of Tequila Don Julio Reposado. This collaboration isn’t about adding alcohol to food—it’s about infusing the rich, oaky undertones of reposado tequila into Popeyes’ crispy, flavorful chicken.
The Highlights:
Popeyes x Tequila Don Julio Reposado Flavored Concha Roll Chicken Sandwich – A crispy chicken fillet, lightly infused with tequila-inspired flavors, served on a sweet concha roll. Popeyes x Tequila Don Julio Reposado Flavored Louisiana Garlic 3-Piece Wings – Juicy, garlic-butter-coated wings with a hint of reposado warmth.
The Essence of Popeyes Don Julio
Popeyes is no stranger to bold flavors, but this partnership takes things to another level. The concha roll, a sweet Mexican pastry, adds a surprising contrast to the crispy chicken sandwich, creating a balance of salty, savory, and sweet. Meanwhile, the Louisiana Garlic Wings bring a zesty, aromatic depth, making them a perfect choice for garlic lovers.
Why This Combo Works:
Southern Soul Meets Mexican Heritage – Popeyes’ deep-fried mastery meets Don Julio’s iconic tequila for a cross-cultural culinary experience.
Sweet & Savory Perfection – The concha roll’s buttery softness enhances the crunch of the fried chicken.
Garlic Butter & Tequila Magic – The reposado-infused wings provide a bold yet balanced punch of heat and umami.
Crafting the Perfect Popeyes Don Julio-Inspired Recipe at Home
Want to bring these flavors to your own kitchen? Here’s a simple guide to recreating the experience.
Homemade Popeyes-Style Chicken with a Tequila Twist
Ingredients:
4 boneless chicken thighs
2 cups buttermilk
1 tbsp hot sauce
1 cup all-purpose flour
½ cup cornstarch
1 tsp paprika
1 tsp garlic powder
½ tsp cayenne pepper
½ tsp black pepper
1 tsp salt
Vegetable oil (for frying)
2 sweet concha rolls (or brioche buns)
1 tbsp honey butter
For the Tequila-Laced Louisiana Garlic Sauce:
3 tbsp unsalted butter
4 garlic cloves (minced)
1 tbsp honey
1 tbsp lime juice
1 tbsp tequila (optional for depth of flavor)
Instructions:
Marinate the Chicken – Combine buttermilk and hot sauce. Soak the chicken for at least 4 hours (overnight for best results).
Prepare the Coating – Mix flour, cornstarch, and seasonings in a bowl.
Fry to Perfection – Heat oil to 350°F and fry chicken for about 6 minutes per side until golden brown.
Make the Garlic Butter Sauce – Melt butter, sauté garlic, and mix in honey, lime juice, and a touch of tequila.
Assemble – Spread honey butter on the concha roll, add crispy chicken, and drizzle with garlic sauce.
Expert Tips for Success
Double Dredge for Extra Crispiness – Coat the chicken twice for a thicker, crunchier texture.
Use Fresh Garlic – It enhances the sauce’s depth and richness.
Let the Chicken Rest – Allow fried chicken to rest for 5 minutes before serving for better juiciness.
Don’t Skip the Buttermilk Soak – It tenderizes the chicken and infuses it with flavor.
A homemade take on the Popeyes x Tequila Don Julio Reposado Flavored Concha Roll Chicken Sandwich and Louisiana Garlic Wings with a crispy, tequila-infused twist.
Marinate the Chicken – Combine buttermilk and hot sauce. Soak the chicken for at least 4 hours (overnight for best results).
Prepare the Coating – Mix flour, cornstarch, and seasonings in a bowl.
Fry to Perfection – Heat oil to 350°F and fry chicken for about 6 minutes per side until golden brown.
Make the Garlic Butter Sauce – Melt butter, sauté garlic, and mix in honey, lime juice, and a touch of tequila.
Assemble – Spread honey butter on the concha roll, add crispy chicken, and drizzle with garlic sauce.
Notes
Double Dredge for Extra Crispiness – Coat the chicken twice for a thicker, crunchier texture.
Use Fresh Garlic – It enhances the sauce’s depth and richness.
Let the Chicken Rest – Allow fried chicken to rest for 5 minutes before serving for better juiciness.
Don’t Skip the Buttermilk Soak – It tenderizes the chicken and infuses it with flavor.
Nutrition
Calories: 720kcal
Serving Suggestions & Pairings
Looking to elevate your homemade Popeyes Don Julio experience? Pair your meal with:
Spicy Margarita – A classic tequila-based drink complements the flavors perfectly.
Crispy Cajun Fries – A side of seasoned fries balances the richness of the sandwich.
Mexican Street Corn – The smoky, cheesy flavors of elote match well with garlic-infused wings.
Storage Information
Room Temperature: Best eaten fresh but can be kept warm for up to 1 hour.
Refrigeration: Store leftovers in an airtight container for up to 3 days.
Freezing: Freeze fried chicken separately for up to 2 months; reheat in the oven.
Nutrition Facts (Per Serving)
Nutrient
Amount
Calories
750
Protein
42g
Carbohydrates
65g
Fat
38g
Sodium
1200mg
FAQ
Does this Popeyes meal contain alcohol?
No, the tequila flavor is infused without actual alcohol content.
Where can I try the Popeyes Don Julio items?
These items are available for a limited time at select Popeyes locations.
Can I make this recipe without tequila?
Absolutely! You can substitute tequila with apple cider vinegar for a similar tang.
What’s the best way to reheat fried chicken?
Use an oven at 375°F for 10 minutes to keep it crispy.
Are concha rolls easy to find?
Yes, they’re available at most Mexican bakeries, or you can substitute them with brioche buns.
Conclusion
The Popeyes x Don Julio collaboration is a game-changer, combining sweet, savory, and bold flavors into one unforgettable meal. Whether you’re grabbing it from Popeyes or making it at home, this fusion is worth experiencing. Ready to give it a try? Let us know how it turns out in the comments below!
There’s a certain magic in waking up to the smell of pancakes sizzling on a griddle. It’s nostalgic, comforting, and for many of us, it brings back memories of lazy Sunday mornings with family. But if you’ve ever bitten into a pancake that was too flat, too dense, or just a little boring, you’re not alone.
Most pancake recipes follow the same formula, and while that’s fine for the average breakfast, this one? It takes things to a whole new level.
These aren’t your grandma’s pancakes. This version adds a gently spicy, aromatic twist: fresh ginger. It’s subtle, unexpected, and once you try it, you may never go back. Plus, it’s packed with flavor and comes with a few surprising health benefits.
The Origin of This Pancake Twist
I stumbled upon the ginger-in-batter idea while traveling through Osaka, Japan. One chilly morning, I was served a stack of cloud-like pancakes with an earthy warmth that I couldn’t quite place. The cook smiled when I asked, and simply said, “Shōga.” That’s Japanese for ginger.
Inspired, I began experimenting at home. Fresh ginger in pancakes? Yes, and it turns out, it’s not just a culinary choice; it’s a wellness one, too. Ginger helps stimulate digestion, eases inflammation, and warms you from the inside out — exactly what a good breakfast should do.
Perfect Fluffy Pancakes with a Japanese Ginger Twist
These homemade pancakes are light, fluffy, and incredibly delicious. A secret ingredient—grated ginger—adds a subtle warmth and boosts digestion, making them both indulgent and beneficial for health. Whether you enjoy them with classic maple syrup or fresh fruit, these pancakes will become your go-to breakfast recipe!
Course Breakfast, Brunch
Cuisine American, American, Japanese-Inspired, Japanese
Keyword best ginger trick recipe, fluffy pancakes, ginger trick recipe, Japanese ginger trick recipe, pancakes
Prep Time 10 minutesminutes
Cook Time 15 minutesminutes
Resting Time 10 minutesminutes
Total Time 35 minutesminutes
Servings 3
Calories 120kcal
Cost 4
Equipment
Mixing bowls (2) – One for dry ingredients, one for wet ingredients
Whisk – For mixing the batter
Measuring cups & spoons – For precise ingredient measurements
Griddle or non-stick pan – To cook the pancakes evenly
Ladle or ¼ cup measuring cup – For pouring batter onto the pan
In a large bowl, whisk together the flour, baking powder, sugar, and salt.
Prep the Wet
In a separate bowl, whisk the egg, milk, melted butter, vanilla, and grated ginger. If using cinnamon, add it here too.
Combine Gently
Pour the wet mixture into the dry and stir just until combined. Don’t overmix! Lumps are okay — overworking the batter makes pancakes tough.
Let It Rest
Cover the bowl with a towel and let the batter rest for 10 minutes. This helps the flour absorb moisture and gives you that ultra-soft texture.
Cook With Care
Preheat a non-stick pan or griddle over medium heat. Lightly grease with butter or spray oil. Use a ¼ cup measure to pour batter. When bubbles form and edges look dry (about 2–3 minutes), flip and cook 1–2 minutes more.
Serve and Stack
Plate them hot and fluffy. Add toppings, drizzle syrup, and serve immediately.
Notes
For Extra Fluffiness: Add ½ teaspoon of apple cider vinegar to the milk and let it sit for 5 minutes before mixing.
Vegan Alternative: Replace the egg with 1 mashed banana or ¼ cup applesauce.
Savory Twist: Skip the sugar and add chopped scallions and a pinch of black pepper.
For Weight Loss: Use almond milk, coconut oil, and whole wheat flour.
Storage Tip: Freeze pancakes in a single layer and reheat in the toaster for quick breakfasts.
Nutrition
Calories: 120kcal
Pro Pancake Tips
Use buttermilk for an even richer texture. No buttermilk? Add 1 tsp apple cider vinegar to your milk and let it sit for 5 minutes.
Don’t flip too early — wait for bubbles and dry edges.
Fresh ginger only. Powdered ginger won’t give you the same flavor or aroma.
Resting = fluffier. Don’t skip it!
Topping Ideas
Classic: Real maple syrup and a pat of butter
Healthy: Fresh berries, Greek yogurt, and honey
Fall Flavor: Apple slices sautéed in cinnamon and butter
Global-Inspired: A spoonful of tangy plum jam or black sesame paste
Spicy-Sweet: Candied ginger pieces and a drizzle of warm honey
Variations You’ll Love
Vegan Version: Use almond milk, coconut oil, and a flax egg (1 tbsp ground flax + 3 tbsp water).
High Protein: Replace ¼ cup flour with your favorite protein powder.
Savory Spin: Skip sugar, add chopped scallions and black pepper. Serve with eggs!
Storage & Meal Prep
Refrigerate:
Stack leftovers with parchment between them. Store in an airtight container for up to 5 days.
Freeze:
Place cooled pancakes in a single layer on a tray. Freeze, then transfer to a zip bag. Reheat in toaster or oven at 350°F for 10 minutes.
Nutrition (Per Pancake Approx.)
Nutrient
Amount
Calories
120
Carbs
18g
Protein
4g
Fat
4g
Fiber
1g
Frequently Asked Questions
Can I use ground ginger instead of fresh?
You can, but the flavor won’t be as bright or aromatic. Fresh ginger is worth the extra minute.
What milk works best?
Whole milk or almond milk are both great. Buttermilk makes them even fluffier.
Can I make the batter the night before?
Yes , store it covered in the fridge. Stir gently before using.
What’s the deal with ginger and digestion?
Ginger has been used for centuries to soothe the stomach, support metabolism, and fight inflammation — perfect for starting your day right.
Final Thoughts
If you’ve been on the hunt for the perfect pancake recipe , fluffy, flavorful, and just a bit different, this is the one to bookmark. The ginger isn’t overpowering; it’s elegant. It makes each bite feel warm, slightly exotic, and totally satisfying.
Whether you’re making a lazy weekend brunch, trying to impress guests, or just want something better than boxed mix, these pancakes deliver. And best of all, they’re easy enough to whip up before your coffee finishes brewing.
So try the ginger twist. You just might never go back.
I didn’t set out to create a “detox.” I just needed something better than coffee to start my mornings something that actually made me feel awake and settled instead of jittery and acidic.
That’s how this pineapple ginger wellness drink became part of my routine. Not because it promised to flush anything or shed pounds overnight, but because it helped me feel good. Light. Refreshed. Ready.
This is a drink I now make every morning for 14 days at a time, especially when I want to get back in tune with my body and slow down enough to care for it.
It’s easy to make, tastes bright and tropical, and takes less time than brewing a cup of tea.
Let’s talk about why it works and how to make it work for you.
Why Pineapple and Ginger?
When I first tried combining these two, I wasn’t thinking about health benefits. I just had leftover pineapple in the fridge and a nub of ginger that needed to be used. But something about the combination caught me off guard.
The pineapple was sweet and juicy. The ginger had this warm bite that cut through the sweetness. Together, they felt like a spark not sugary, not sour, just fresh. So I looked into it.
Here’s what I found:
Pineapple is rich in bromelain, a natural enzyme that supports digestion. It also provides vitamin C and natural hydration, which we often overlook first thing in the morning.
Ginger has long been used to ease bloating, reduce nausea, and support gut function. It’s warming, calming, and energizing all at once.
Lemon juice, which I added later, helps balance the sweetness and gives the drink a clean finish.
I don’t believe in magic drinks, but I do believe in the power of simple ingredients done well, especially when they become part of a routine.
How I Use This Drink for 14 Days
There’s no strict plan here. No countdowns or weigh-ins. Just a commitment to start each day with something real.
I drink one glass every morning before I eat. That’s it.
I’ve found that doing this for two weeks makes me:
Reach for healthier meals (because I’ve already made one good choice)
Drink more water (the habit of pouring this helps me keep sipping)
Feel less bloated in the afternoons
Crave fewer sugary snacks, since my mornings aren’t starting with caffeine or processed foods
Some mornings I blend the drink fresh. Other days I make enough for two mornings and store the second half in a jar. Either way, the whole process takes under 5 minutes.
A refreshing, nutrient-packed drink to cleanse and energize your body.
Course Beverage, Detox
Cuisine International
Keyword 14 day pineapple detox drink recipe, ginger trick drink, Pineapple detox, weight loss
Prep Time 10 minutesminutes
Cook Time 0 minutesminutes
Total Time 10 minutesminutes
Servings 2
Calories 80kcal
Cost 5
Equipment
A blender (any basic one works)
A fine mesh strainer or nut milk bag (only if you don’t like pulp)
A jar or bottle to store any extra
Ingredients
1cupfresh pineapple chunksripe and sweet
1-inchpiece of fresh gingerpeeled
Juice of 1 lemon
2cupscold water
Optional: a few mint leaves or cucumber slices
💡 Tip: If your pineapple isn’t very sweetyou can add one slice of apple for balance — no sugar needed.
Instructions
Blend everything. Add the pineapple, ginger, lemon juice, and water to your blender. Blend for about 30–45 seconds, or until the mix is completely smooth.
Strain (optional). If you want a smooth juice, strain through a mesh sieve. I like mine with pulp — it feels more filling.
Serve cold. Pour over ice or chill in the fridge before drinking.
That’s it. No boiling. No prep the night before. Just fresh ingredients and a blender.
Notes
Use fresh ingredients, avoid sugar, and store in the fridge.
Nutrition
Calories: 80kcal
How This Fits Into a Wellness Routine
Let’s be clear: this is not a replacement for food. It’s not a cleanse or a reset or a weight-loss secret. It’s a small daily choice that reminds your body you’re paying attention.
I drink it before breakfast, usually before 9am. On weekends, I’ll sip it while journaling or sitting on my porch. On workdays, I grab it to go and drink it during emails.
Over 14 days, this drink becomes more than a recipe. It becomes a reminder: to hydrate, to eat more fruit, to take 5 minutes in the morning for yourself.
Variations to Keep Things Interesting
To keep it from feeling like a chore, I switch things up every few days. Here are my favorite tweaks:
Coconut Water Base – swap water for coconut water to boost electrolytes.
Add a Cucumber Slice – it tones down the pineapple for a more spa-like feel.
Green Ginger – toss in a handful of spinach for color and nutrients. You won’t taste it.
Spicy Morning Kick – add a pinch of cayenne if you like heat.
How to Store It
Refrigerator: Keeps for up to 48 hours in a sealed jar.
Shake before drinking: Natural separation is normal — just swirl or shake.
Don’t freeze: The flavor gets dull after thawing, and the texture changes.
Nutritional Snapshot (Per Serving)
Nutrient
Amount (approx.)
Calories
80 kcal
Carbohydrates
20g
Natural Sugars
14g
Fiber
2g
Vitamin C
~30% DV
All values are estimated and based on use of fresh fruit.
Affiliate Suggestions (Insert links as needed)
Here are a few tools I personally use for this drink:
Glass juice jars – great for prepping two days in advance
Citrus juicer – easier on your wrists than squeezing by hand
Ginger grater or microplane – if you want a smoother blend
High-speed blender – helps break down the ginger and pineapple pulp
Real Questions I’ve Gotten From Friends
Can I use frozen pineapple?
Yes! Just let it thaw a bit before blending so it mixes smoothly.
Is this safe if I’m pregnant or breastfeeding?
Most ingredients are food-safe, but it’s always a good idea to ask your doctor, especially when using fresh ginger regularly.
Can I sweeten it?
I recommend trying it as-is first. If it’s too tart, a slice of apple or a teaspoon of raw honey is better than sugar.
What if I skip a day?
No big deal. This isn’t a test — it’s a habit. Just start again the next morning.
Final Thoughts
This drink won’t “cleanse your liver” or promise anything dramatic and that’s the point. It’s a gentle, grounding habit. A way to start your day feeling refreshed without stimulants or sugar crashes.
Over 14 days, you might notice your digestion feels smoother. You might find yourself drinking more water, or choosing lighter meals. Or maybe you just look forward to it as a moment of calm in your busy routine.
Try it. Not for the scale. Not for the trend. But because it tastes good and helps you reconnect with what your body actually wants: something clean, fresh, and simple.
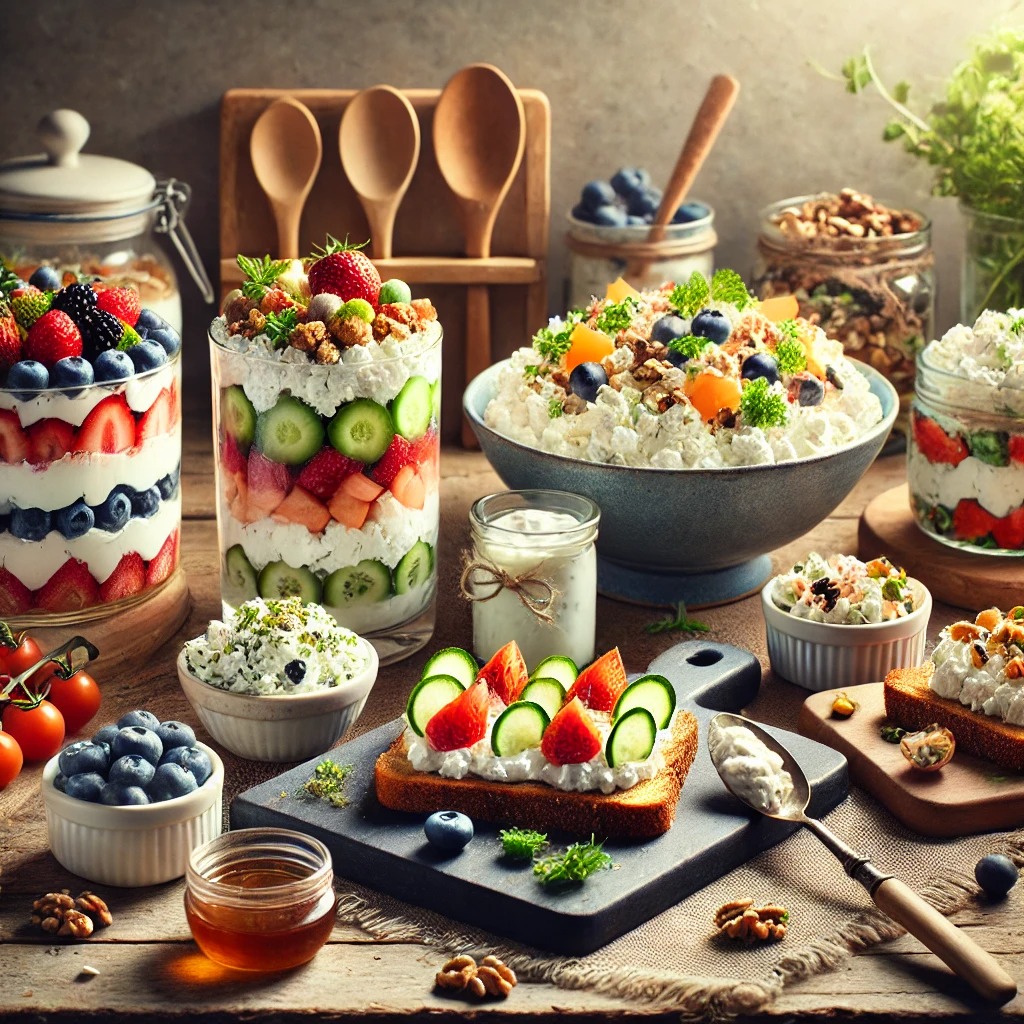
There’s a quiet superstar sitting in your fridge and no, it’s not Greek yogurt or almond milk. It’s cottage cheese a humble, protein-packed ingredient that deserves far more attention than it gets.
If you’ve written it off as bland or boring, these 15 creative, low-calorie, high-protein cottage cheese recipes will completely change your mind.
From crispy potato skins to keto pizza crust and even sweet, satisfying desserts, this list covers all the bases. Whether you’re tracking macros, trying to eat clean, or simply looking for ways to shake up your meals, cottage cheese is your secret weapon.
What Makes Cottage Cheese So Great?
Cottage cheese is a fresh cheese made from curds and whey. It’s mild in flavor, slightly tangy, and surprisingly versatile. It’s packed with protein, low in fat, and works beautifully in both sweet and savory dishes.
Calories per 1/2 cup (low-fat): ~90
Protein: ~12g
Fat: ~2g
Carbs: ~3g
Whether you’re on a low-carb, keto, or high-protein plan, this little dairy gem fits right in.
15 Cottage Cheese Recipes You’ll Want to Make Again and Again
1. Air Fryer Baked Potato Skins with Cottage Cheese
Scoop out baked potatoes, mix the flesh with cottage cheese and chives, refill the skins, and crisp them in the air fryer. High protein and totally satisfying.
2. Cottage Cheese Pizza Crust (Keto-Friendly)
Blend cottage cheese, egg, almond flour, and mozzarella for a chewy, low-carb base. Top with tomato sauce, more cheese, and your favorite toppings.
3. Cottage Cheese Cheesecake Cups
Lighten up dessert by whipping cottage cheese with honey, Greek yogurt, vanilla, and a graham cracker crust. Chill and top with berries.
4. Savory Cottage Cheese Breakfast Bowl
Layer cottage cheese with avocado slices, cherry tomatoes, and a soft-boiled egg. Season with salt, pepper, and chili flakes for a low-carb start to your day.
5. Protein-Packed Pancakes
Blend cottage cheese with oats, eggs, and banana to create fluffy, high-protein pancakes. Serve with maple syrup or almond butter.
Crispy potato skins filled with creamy cottage cheese and chives.
Course Appetizer
Cuisine American
Keyword cottage cheese breakfast recipes, cottage cheese dessert recipes, cottage cheese recipe for air fryer baked potato skins
Prep Time 10 minutesminutes
Cook Time 10 minutesminutes
Total Time 20 minutesminutes
Servings 4
Calories 120kcal
Cost 5
Equipment
Air fryer, mixing bowl, knife
Ingredients
4baked potatoes
1cupcottage cheese
2tbspchives
Salt and pepper to taste
Instructions
Scoop out potato flesh and mix with cottage cheese and chives.
Fill potato skins and air fry at 375°F for 10 minutes.
Notes
Add bacon bits for extra flavor.
Nutrition
Calories: 120kcal
Expert Tips for Cooking with Cottage Cheese
Use it fresh – always check the expiration date for best taste.
Blend for creaminess – a quick blitz in a blender transforms it into a ricotta-like texture.
Great for baking – use in muffins, pancakes, or casseroles for extra moisture and protein.
Don’t fear the tang – its slight sourness disappears when mixed into dishes.
Serving Suggestions & Pairings
Sweet: Pancakes + berries + maple syrup
Savory: Scrambled eggs + toast + hot sauce
Snack: Spoonful with fruit and cinnamon
Gourmet: Top it on grain bowls or roast veggies
Storage Tips
Fridge: Keep cottage cheese in its original container or airtight bowl for up to 7 days.
Don’t freeze: Freezing changes the texture, it separates and becomes grainy.
Frequently Asked Questions
Can I use low-fat cottage cheese in every recipe?
Yes, just expect a slightly less creamy texture. It still works beautifully in most dishes.
Is cottage cheese gluten-free?
Plain cottage cheese is naturally gluten-free. Always check flavored or pre-mixed versions.
Can I substitute cottage cheese for ricotta?
Absolutely. Just blend it for smoother consistency in lasagna or desserts.
How do I make it taste better?
Season it! Salt, pepper, herbs, honey, cinnamon, all of these help enhance its mild flavor.
Is it good for weight loss?
Yes, thanks to its high protein content and low calorie count.
Final Thoughts
If you’ve been sleeping on cottage cheese, now’s the time to wake up. These 15 creative recipes prove it can be the star of every meal breakfast, lunch, dinner, or dessert. With low calories, high protein, and endless versatility, cottage cheese isn’t just a diet food, it’s a flavorful foundation for everyday meals.
So grab a tub and start experimenting. You might just discover your new favorite ingredient.


